Building a pavilion requires setting posts in concrete footings, framing a roof structure, and installing your chosen roofing material. Most beginner-friendly builds take one to two weekends depending on size and the number of helpers you have.
Getting the process right from the start saves you from costly mistakes that happen when people skip the planning stages. This guide walks through every stage clearly so you know exactly what to do before picking up a single tool.
Planning Your Pavilion Project
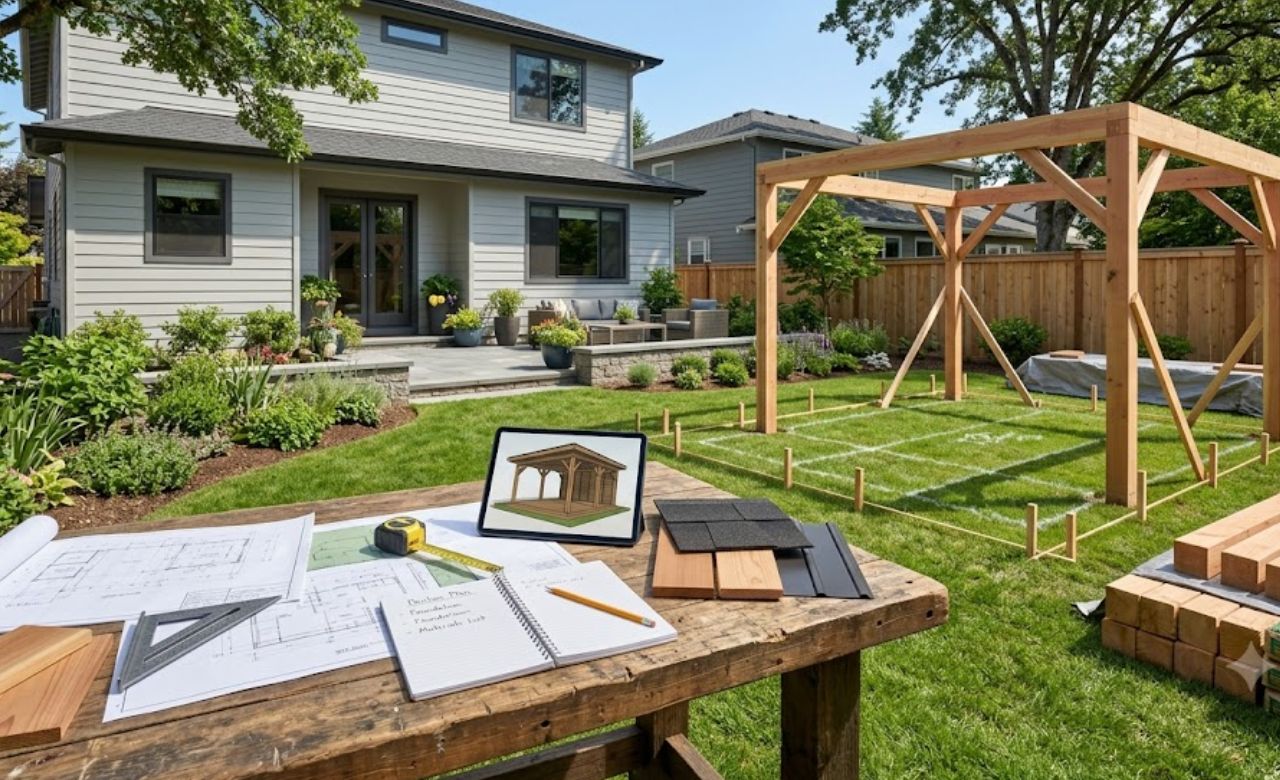
Good planning separates a smooth pavilion build from one that stalls halfway through. Spend as much time on this stage as on the build itself and the whole project runs significantly better.
Start by deciding your size, placement, roofing style, and primary use before buying anything. These four decisions drive every other choice in the project from post size to roof pitch.
Key Planning Decisions to Make First
- Pavilion size and footprint based on available yard space
- Placement relative to sun angles and existing structures
- Roofing material and style suited to your climate
- Primary use whether dining lounging or entertaining
Check Local Permits Before Starting
Most permanent pavilion structures require a building permit especially when they exceed a certain square footage. Contact your local building department about setback distances, height limits, and foundation requirements before doing anything else.
- Setback distance requirements from property boundaries
- Maximum structure height allowed in your zone
- Foundation depth requirements for your local frost line
- Permit fees and typical processing timeframes
- Inspection requirements during and after the build
Step 1: Mark and Lay Out the Footprint
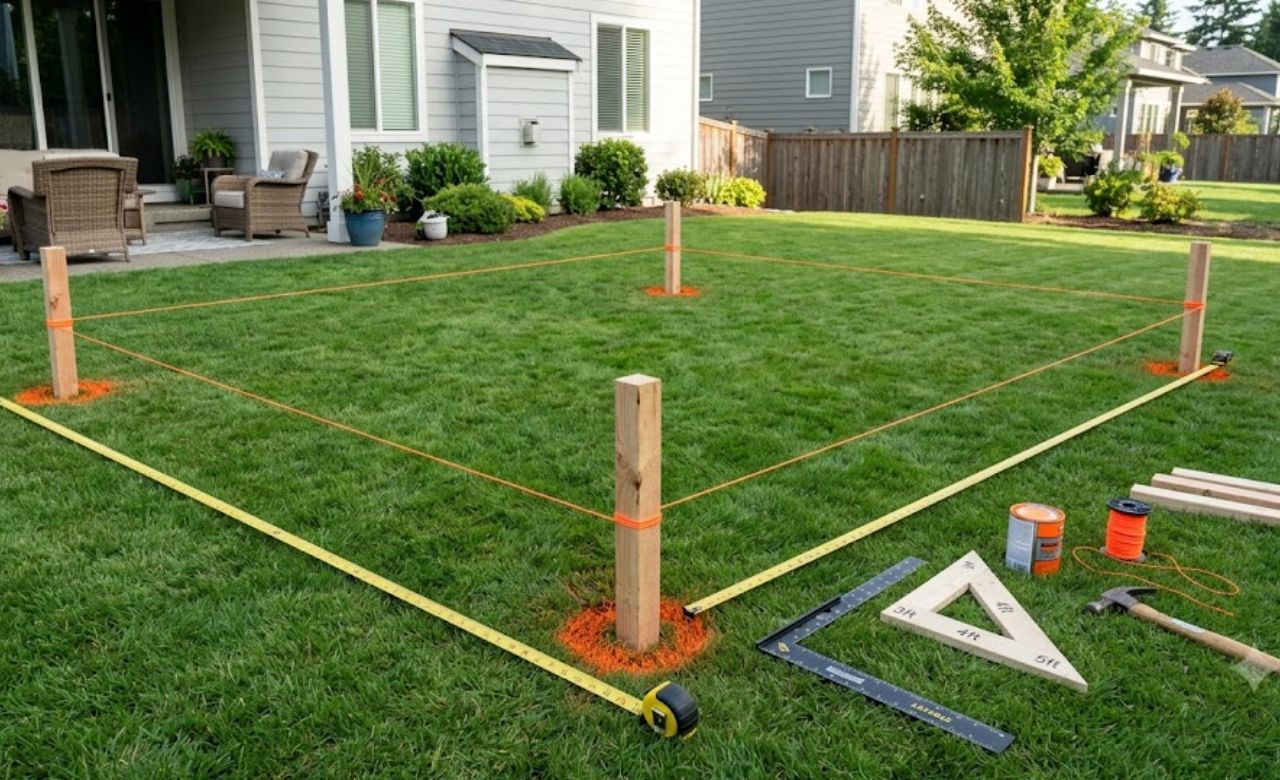
Accurate layout makes every step that follows easier and more precise. Use timber stakes and string lines to mark each post hole position and check corners are square using the 3-4-5 triangle method before digging anything.
Measure diagonally from corner to corner in both directions. Both measurements must match exactly before you commit to digging.
Layout Steps in Order
- Drive a stake at your first corner position
- Measure out your first side and drive a second stake
- Use the 3-4-5 triangle method to set each square corner
- Run string lines between all corner stakes
- Mark post hole centers with spray paint on the ground
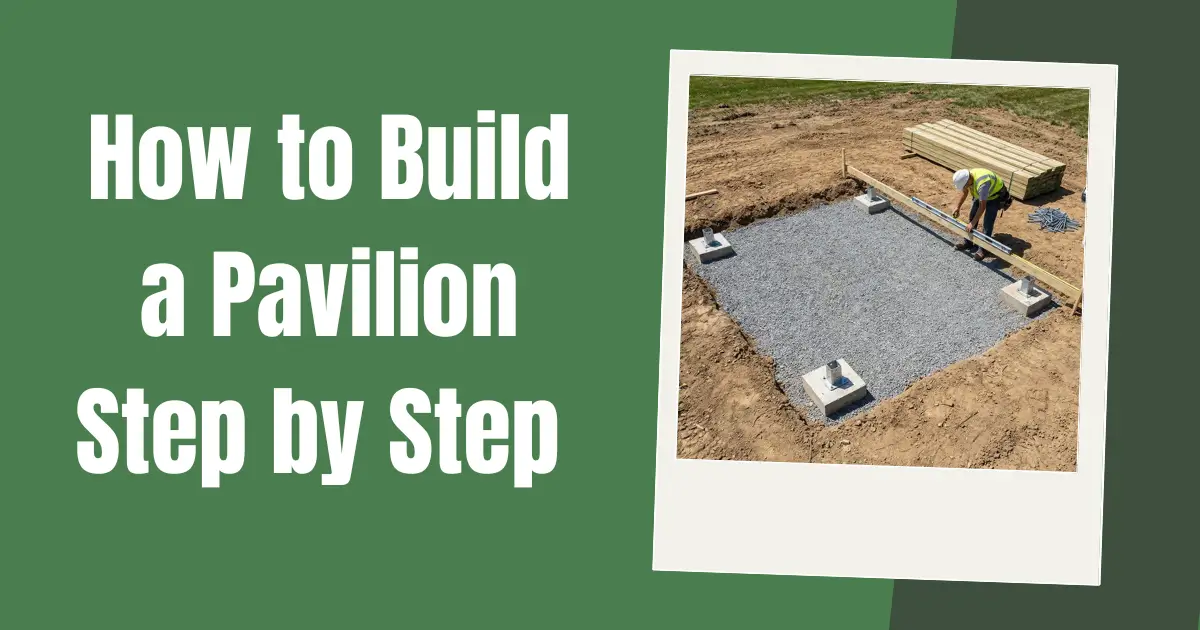
Step 2: Dig and Set Your Footings
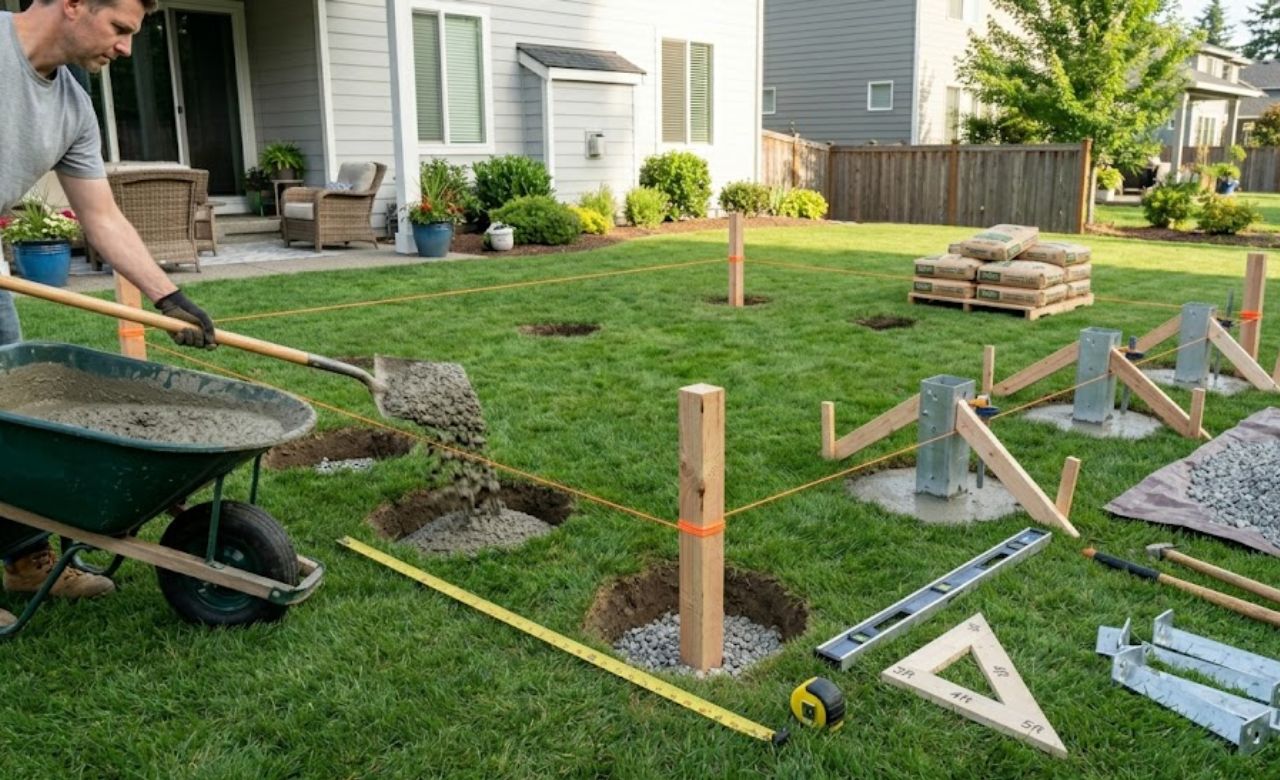
Footings are the most physically demanding part of the build and also the most structurally important. Footings that are too shallow allow posts to shift over time and that movement works through the entire structure above.
Footing depth depends on your local frost line. Your local building department can give you the exact requirement for your area.
Footing Installation Steps
- Dig holes to the required depth for your climate zone
- Add four inches of compacted gravel at the bottom for drainage
- Mix and pour concrete to ground level in each hole
- Insert post base hardware while concrete is still wet
- Allow concrete to cure for a minimum of 48 hours before building
Step 3: Set and Brace the Posts
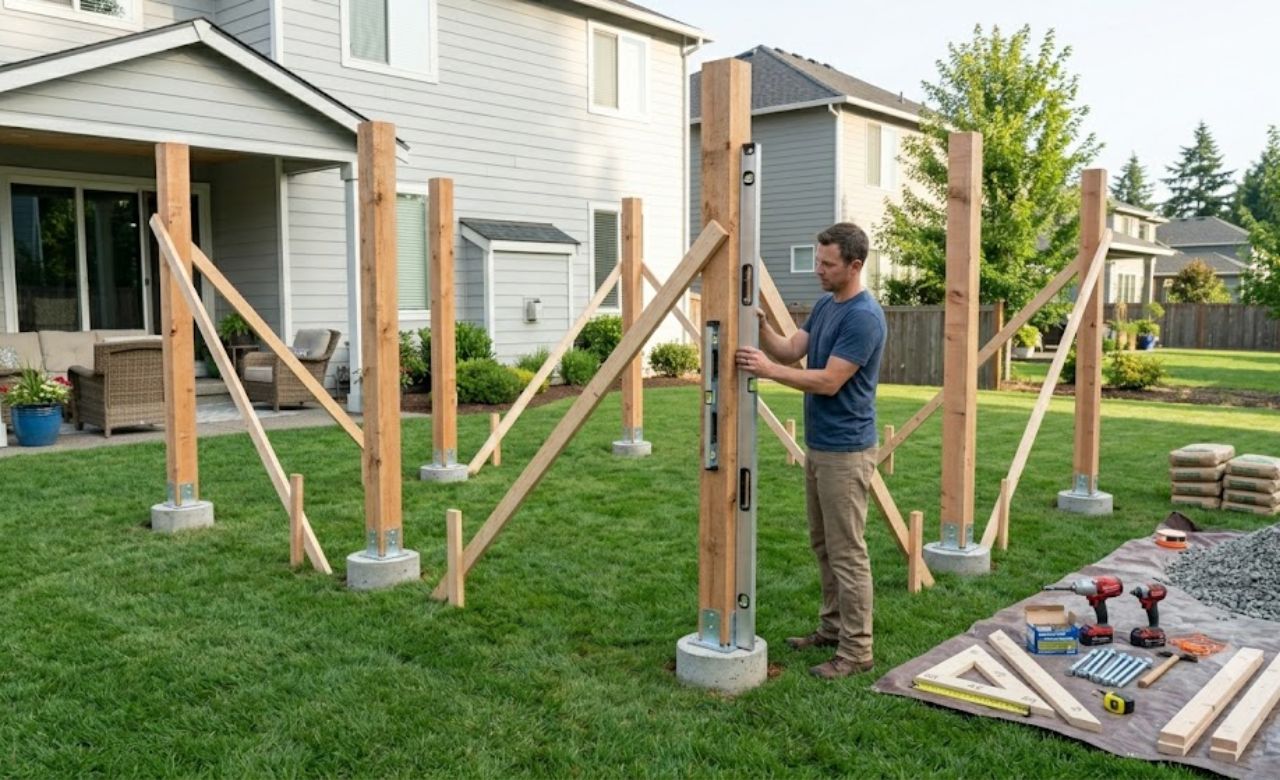
Setting posts perfectly plumb in all directions is the single skill that most determines how the finished pavilion looks. Use post base hardware bolted to your cured footings to hold posts up off the ground and prevent moisture rot at the base.
Check plumb on two adjacent faces with a long level before securing anything permanently.
Post Setting Steps
- Set post into the base hardware at each footing
- Check plumb on two adjacent faces with a long level
- Secure with temporary diagonal braces to ground stakes
- Fasten post to base hardware with the specified bolts
- Leave all braces in place until perimeter beams are fully installed
Step 4: Install the Perimeter Beams
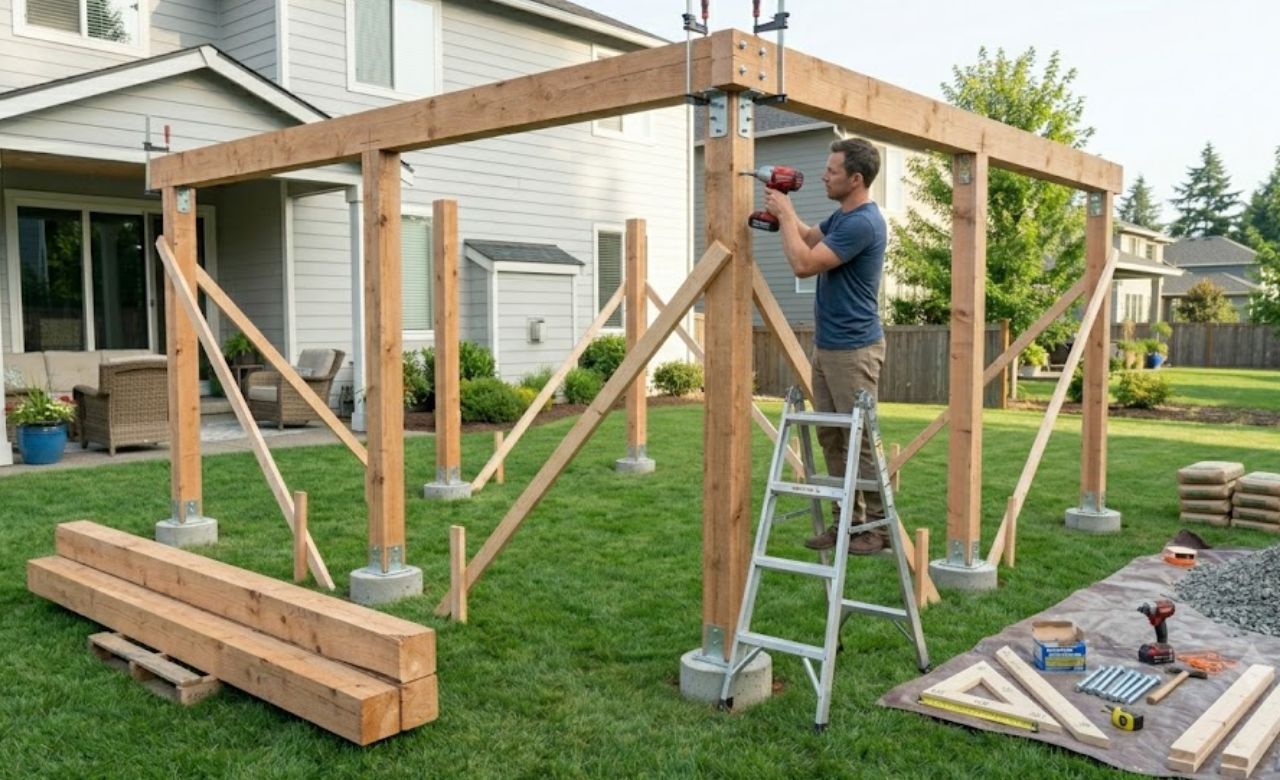
Perimeter beams connect your posts at the top and create the frame that the entire roof structure sits on. Getting these perfectly level with each other is critical because an unlevel beam frame produces a roof that sheds water incorrectly.
Mark the height on every post before lifting any lumber so you know exactly where each beam lands.
Beam Installation Steps
- Mark beam height on all posts at exactly the same level
- Cut beams to length with the correct angle cuts at corners
- Pre-drill all bolt holes to prevent lumber splitting
- Lift beam into position with at least one helper
- Drive lag bolts through beam into post at each connection
Step 5: Frame and Install the Roof
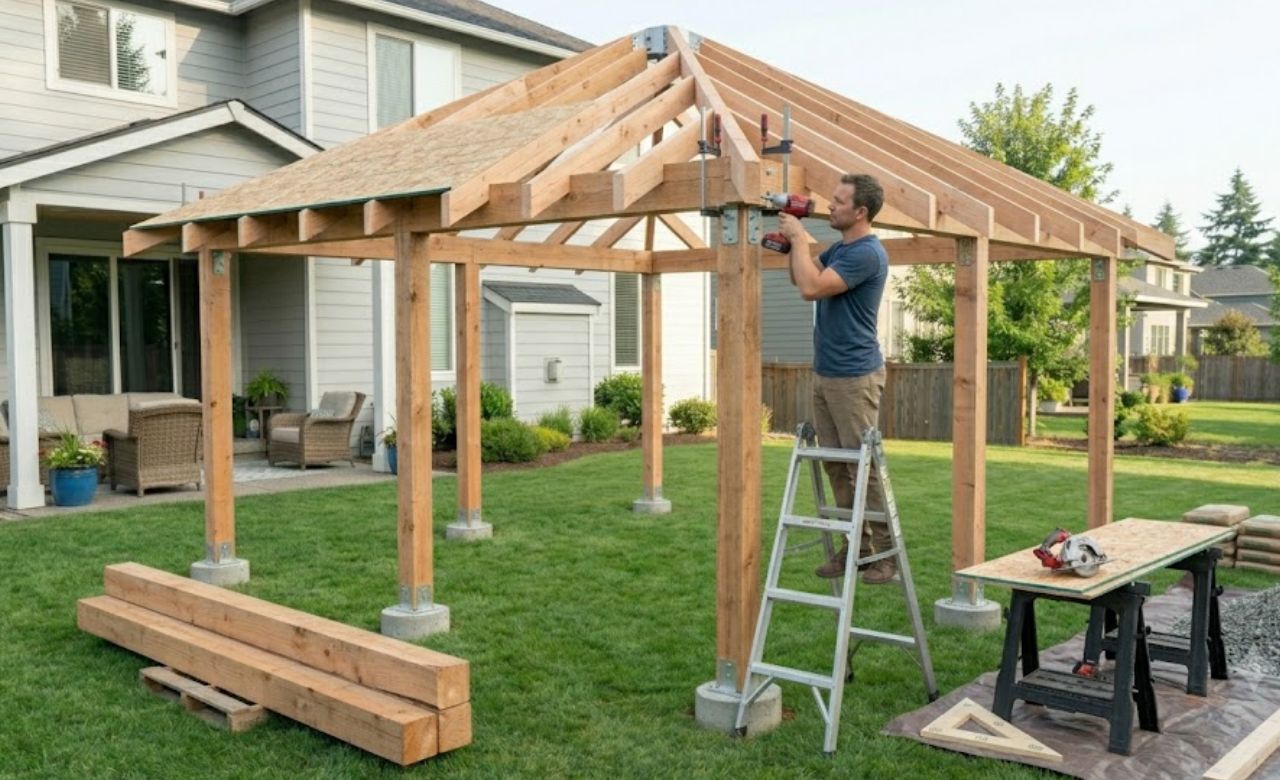
Roof framing is where the pavilion starts to look like a finished structure. Pre-cut all rafters to the same length and angle before installation so the process moves quickly and consistently.
For a square pavilion all four rafters meet at a central hub connector at the peak. Pre-made hub connectors make this junction clean and solid without advanced carpentry skills.
Roof Framing Steps
- Install center ridge board or hub connector first
- Cut all rafters to matching length and bevel angle
- Install one rafter at each corner post to establish the plane
- Fill in intermediate rafters at even spacing between corners
- Install roof sheathing boards across the rafter tops
Step 6: Install Roofing Material and Finish Details
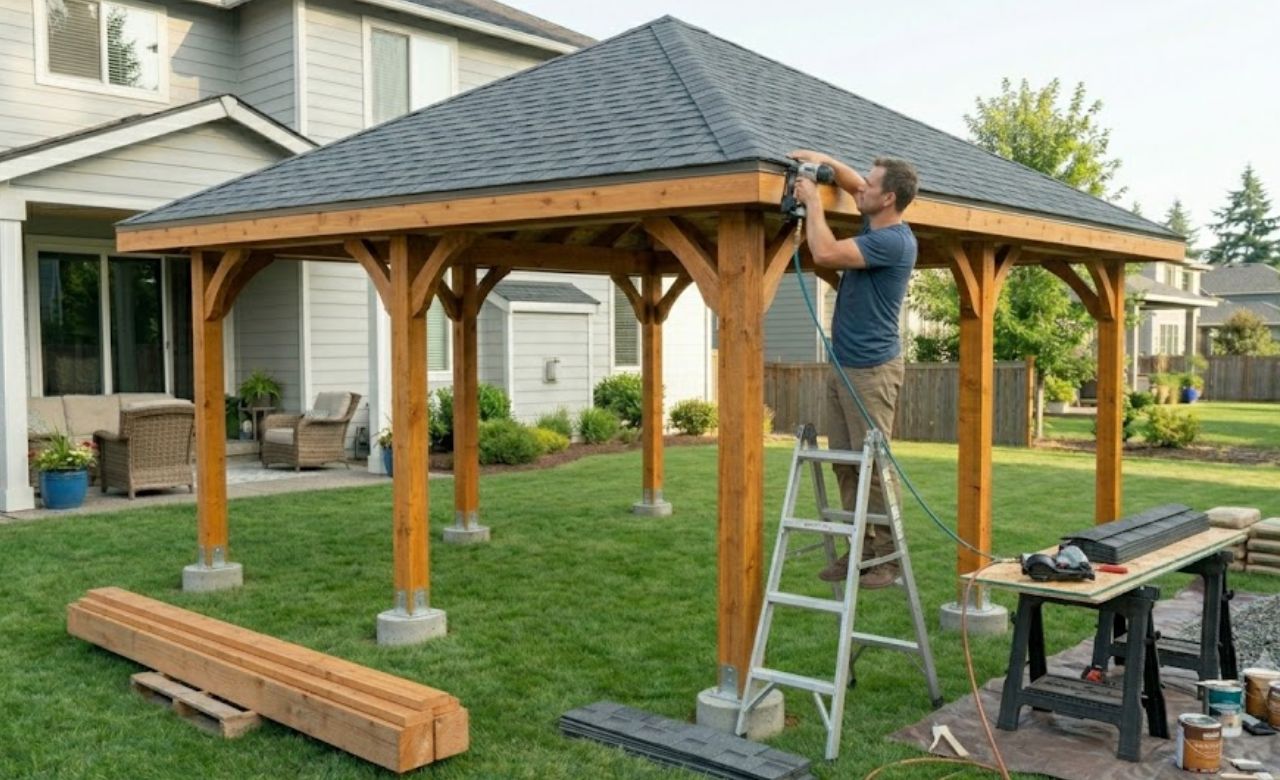
Start roofing material at the lowest edge and work upward so each row overlaps the one below. This overlap direction sheds water away from the structure and prevents the leaks that catch most DIY builds out.
Finishing details like fascia boards, trim pieces, and a final coat of exterior sealant are what make a pavilion look professionally built rather than homemade.
Finishing Steps in Order
- Install drip edge along the bottom perimeter of the roof
- Staple roofing felt over all sheathing boards
- Install roofing material starting from the bottom edge upward
- Install ridge cap pieces at the peak and seal all joints
- Apply exterior wood stain or sealant to all exposed timber surfaces
How to Best Build a Pavilion Roof At Your Backyard
Choosing the right roof style and material is one of the most impactful decisions in the project. The roof determines how the structure looks from a distance and how well it handles your local weather conditions.
Hip and pyramid roofs are the two most beginner-friendly styles for a square or rectangular pavilion. Both shed water effectively in all directions and require only basic rafter cutting skills.
Most Popular Pavilion Roof Styles
- Hip roof for effective water shedding on all four sides
- Pyramid roof for a classic pavilion look on square footprints
- Gable roof for the simplest framing on rectangular footprints
- Shed roof for an attached or lean-to pavilion design
Best Roofing Materials for a Pavilion
- Asphalt shingles for affordability and beginner-friendly installation
- Metal panels for longevity and fast rainwater runoff
- Cedar shake shingles for a natural textured appearance
- Polycarbonate panels for rain protection with natural light
Roof Pitch Recommendations
Getting the pitch right matters more than most beginners expect. Too shallow and water pools on the surface. Too steep and the structure looks out of proportion.
- Minimum 3:12 pitch for asphalt shingles to perform correctly
- Minimum 1:12 pitch for metal panels with concealed fasteners
- Steeper pitches of 6:12 and above suit cedar shake materials
- Thatch roofing requires a minimum 45 degree pitch for runoff
How to Build a Pavilion With Fireplace
Adding a fireplace transforms a pavilion into a genuine year-round outdoor living room. Evening gatherings extend into cooler months and the fireplace becomes the natural focal point that draws people in.
Planning a fireplace requires thinking about structural support, ventilation, and clearance distances from the very beginning. Retrofitting one into a pavilion not designed for it is significantly more difficult and costly.
Fireplace Planning Requirements
- Structural foundation designed for the fireplace weight
- Minimum clearance distances from combustible materials
- Chimney height above the pavilion roof peak
- Non-combustible flooring material in the fireplace zone
Fireplace Type Options
- Wood burning masonry fireplace for authentic heat and ambiance
- Gas insert fireplace for convenience and clean operation
- Ethanol fireplace for a no-flue minimal installation
- Prefabricated outdoor fireplace unit for a faster build
Fireplace Construction Steps
Build the firebox from firebrick using refractory mortar rated for heat. Install a stainless steel damper above the firebox and build the chimney with at least one meter clearance above the roof peak.
- Pour a dedicated reinforced concrete footing for the fireplace
- Build the firebox from firebrick using refractory mortar
- Install a stainless steel damper above the firebox opening
- Build the chimney stack with one meter clearance above the roof
- Apply masonry sealer to all exterior chimney surfaces
How to Build a Pavilion Post and Beam Style
Post and beam construction is the most visually impressive way to build a pavilion. Large timber posts connected by heavy beams create a structure with genuine character that light-frame construction cannot replicate.
The structural load is carried entirely by the large timber members themselves. This allows wider spans, more open interiors, and a structural honesty that shows clearly in the finished result.
Timber Sizing for Post and Beam Pavilions
Larger timber always looks more appropriate in a post and beam pavilion than the structural minimum. Getting sizing right is critical because undersized members feel visually wrong even when technically adequate.
- Corner posts minimum 6×6 inches for a standard pavilion
- Main beams minimum 6×8 inches for spans up to 12 feet
- Ridge beam minimum 6×10 inches for longer roof spans
- Purlins at 2×6 minimum spaced at 24 inches on center
Connection Methods for Post and Beam
- Mortise and tenon joints for a traditional timber frame connection
- Structural steel plate connectors for a modern engineered look
- Bolted connections with through-bolts and washers for high loads
- Timber screws at 45 degree angles for rafter to beam connections
Post and Beam Construction Steps
Pre-cut all joints or drill all bolt holes before raising any timber. Raising post and beam frames requires multiple helpers or a mechanical lift for the heavier members.
- Raise posts and secure in base hardware with temporary bracing
- Lift main beams into position with multiple helpers
- Connect ridge beam at the peak using specified hardware
- Install purlins across the roof frame at specified spacing
- Apply exterior wood oil or sealant before roofing goes on
How to Build a Pavilion on a Concrete Slab
Building on a concrete slab is the most stable and low-maintenance foundation option for a permanent pavilion. Slab foundations eliminate ground moisture contact at post bases and provide a clean level floor surface throughout.
You can pour a new dedicated slab or build on an existing patio slab if the thickness and condition are adequate for the post loads you are placing on it.
Pouring a New Concrete Slab
Excavate to at least 150mm below finished floor level and compact the sub-base thoroughly before pouring. Rushing this stage creates a slab that cracks and settles unevenly under load over time.
- Compact the sub-base and add 75mm of compacted gravel
- Install edge formwork at the exact finished slab dimensions
- Lay plastic moisture barrier sheeting across the full area
- Install reinforcing mesh across the full slab area
- Pour concrete to the finished level and screed immediately
Installing Posts on an Existing Slab
Check the existing slab for cracks, soft spots, and adequate thickness before committing to this approach. A slab that is too thin or cracked will not hold expansion anchors securely under pavilion post loads.
- Mark post positions precisely using the string line layout method
- Drill anchor bolt holes using a hammer drill and masonry bit
- Install post base hardware using expansion anchors rated for the load
- Check all bases are perfectly level and aligned before setting posts
Slab Finish Options for a Pavilion Floor
- Exposed aggregate for a slip-resistant natural texture
- Brushed concrete for a clean low-maintenance surface
- Stamped concrete for a decorative patterned finish
- Polished concrete for a smooth contemporary indoor-outdoor look
How to Build a Pavilion on a Deck
Building a pavilion on a timber deck creates a covered outdoor room with a warmth and character that ground-level concrete cannot match. The combination of a timber deck below and a pavilion roof above is one of the most popular and highest-value backyard additions available.
The deck structure must be designed or assessed to handle the additional point loads from the pavilion posts. Standard deck framing designed for furniture may not be adequate without reinforcement.
Assessing Deck Structure for Pavilion Loads
Have the deck structure assessed by a qualified builder before building any pavilion on top of it. This step is non-negotiable for both safety and permit compliance.
- Check existing joist size and spacing for adequacy under point loads
- Inspect all existing fasteners and hardware for corrosion
- Confirm existing footings are deep enough for the combined load
- Double or triple joists below planned pavilion post positions
Connecting Pavilion Posts to a Deck
- Use post base hardware bolted through decking into the framing below
- Position post bases directly above existing or new footings
- Never connect pavilion posts to decking boards alone without structural backing
- Use stainless steel or hot-dipped galvanized hardware throughout
Deck and Pavilion Material Pairing Ideas
- Hardwood deck with matching hardwood pavilion posts and beams
- Composite decking with powder-coated aluminum pavilion frame
- Treated pine deck with painted timber pavilion for a coastal look
- Spotted gum deck with steel frame pavilion for a contemporary result
Common Mistakes to Avoid
- Skipping the permit process and facing removal or fines later
- Setting posts without checking plumb on two adjacent faces
- Rushing concrete cure time and loading structure too early
- Under-sizing posts and beams for the actual span required
- Using standard hardware in high-moisture or pool environments
- Choosing roofing material without accounting for local climate
Pavilion Building Cost and Materials
Understanding realistic costs before starting prevents the most frustrating mid-project problem which is running out of budget before the structure is complete. Material costs vary significantly by region, timber species, and roofing choice.
A basic DIY pavilion using pressure-treated pine with an asphalt shingle roof typically costs between 3,000 and 8,000 dollars in materials for a 12×12 foot structure. Premium materials and added features push costs considerably higher.
Typical Material Cost Ranges
- Pressure-treated pine posts and beams: 800 to 2,000 dollars
- Asphalt shingle roofing materials: 400 to 900 dollars
- Concrete and post hardware: 300 to 600 dollars
- Fasteners brackets and connectors: 200 to 400 dollars
- Exterior stain or sealant: 100 to 250 dollars
Cost Factors That Increase the Budget
- Cedar or hardwood timber over pressure-treated pine
- Metal or tile roofing over asphalt shingles
- Fireplace addition including foundation and chimney
- Electrical installation for lighting and ceiling fans
- Louvered roof system over a standard fixed roof
Ways to Reduce Build Costs
- Source reclaimed timber from demolition salvage suppliers
- Buy materials in bulk before starting the project
- Complete the project in stages across multiple weekends
- Hire a contractor for foundation work only and DIY the framing
Final Thoughts
Building a pavilion from scratch is one of the most satisfying and highest-return outdoor projects available for any homeowner. The finished structure adds real value to the property and creates an outdoor space that gets used daily rather than occasionally.
Follow each step in order, do not rush the concrete, and check for level and plumb at every stage. Those three habits alone will get any first-time builder to a result they are genuinely proud of. Take your time with the planning, stay patient through the foundation work, and the build will come together better than you expect.
Frequently Asked Questions
1. How long does it take to build a pavilion from scratch?
Most DIY pavilion builds take two to four weekends. Concrete curing time adds at least two days between the footing and framing stages.
2. Do I need a permit to build a backyard pavilion?
In most areas yes for any permanent structure. Always check with your local building department before starting since requirements vary by size and location.
3. What is the best wood for a pavilion build?
Cedar and pressure-treated pine are the top choices. Cedar resists moisture and insects naturally while pressure-treated pine is more affordable and widely available at most hardware stores.
4. Can one person build a pavilion alone?
Some steps like cutting and layout can be done solo but setting posts and lifting beams safely requires at least two people. Plan for a helper on the heavy lifting days.